Lab 0: Install Party and Git Intro
NOTE. You do not have to submit anything for this lab. That said, you should at least complete the parts that explain how to set up Haskell and Git.
For this course, you will want four things on your computer:
- A terminal for compiling and running code.
- A good text editor for writing code.
- The latest version of Haskell (8.10 or higher).
- Git for tracking changes in your code and submitting assignments.
Quick Links
- Text Editor: Visual Studio Code or Sublime Text or Atom or Vim or Emacs (Vim and Emacs are often preinstalled, check on your command line).
- Haskell: Download Haskell. You do not need “stack”.
- Git: Download Git, includes a terminal for Windows (“Git Bash”).
Terminal
Compiling and running Haskell programs generally happens on the command line, so you’ll need to have a terminal application.
All macOS machines come with an app called “Terminal” installed.
On Windows, if you don’t have a terminal you’ll get one for free when you install git below (it will be called “Git Bash”).
Terminal Basics
You will want to develop some comfort on the command line. Here’s the bare essentials:
See where you are (“print working directory”):
$ pwd(The $ above is just an indication that you’re on a command line. All you have to type is pwd.)
List what’s in this folder:
$ lsList “all” files (files that begin with . are usually hidden), with “long” information:
$ ls -alLearn about any command by looking at its man page (manual page):
$ man ls(Hit q to quit.)
Enter a folder (“change directory”):
$ cd some_folderGo up one folder:
$ cd ..The “root” folder is /, and your home directory is ~.
Make a folder:
$ mkdir new_directoryMove (or rename!) a file or folder:
$ mv old_name new_nameCopy:
$ cp old_file new_fileCopy a folder (“recursive” copy):
$ cp -r old_folder new_folderLog on to a remote machine:
$ ssh username@computername.cs.uchicago.eduEach computer’s name is written on the side of the machine. Or, there are a few machines for shared use. You can leave SSH with ctrl-d on Mac and Linux and ctrl-z then <Enter> for Windows.
Copy a file to another machine:
$ scp some_file username@computername.cs.uchicago.edu:~/some/path/on/other/machineIf you use a terminal text editor like emacs or vim, you can use ssh to do your homework remotely (although the University is soon to require a VPN for using SSH off-campus).
If some app is running in a terminal and you want it to stop, hit ctrl-c. If some app in the terminal is asking you for input and you don’t want to give it any, hit ctrl-d (end of input). ctrl-d is also a way to end your terminal session.
Text Editor
Microsoft Word ain’t gonna cut it. You want a text editor that makes your code colorful and automatically indents every new line you type.
Visual Studio Code is a popular GUI text editor these days. The lab machines have Sublime Text installed. For VS Code: install the Haskell extension and you will be rewarded with many nice editor features.
On the command line, the popular options are vim and emacs. Both these editors are pre-installed on the lab computers. Using a command-line editor takes some practice, but an experienced user can learn to rapidly perform complicated edits. Another advantage is that these editors can be used on remote machines over SSH. The main disadvantage is you can’t use your mouse.
Haskell
You can install Haskell onto your own machine using these instructions. You just need item 1 under “Platform specific instructions”, you do not need “stack”. Choose the defaults whenever GHCUP asks in purple text “Do you want to…?”.
Mac users may need to first install the XCode command line tools. There should be a dialog that pops up asking you to do it. But if not, you can run:
$ xcode-select --installTo see if you have Haskell installed correctly, open up a Terminal and run:
$ ghci --version
The Glorious Glasgow Haskell Compilation System, version 8.10.7
If your version of GHCi is not 8.10.7, then you may have to troubleshoot. For Mac users, run the command
echo $PATHand check that ~/.ghcup/bin and ~/.cabal/bin appear. If not, you might have to add these to your path. If you have the file ~/.profile or ~/.bash_profile, you can run the following:
$ echo 'PATH=~/.ghcup/bin:~/.cabal/bin:$PATH' >> ~/.bash_profile(If you are using macOS Catalina or later, it is likely that your default shell is Z Shell (Zsh), not Bash. You should be able to tell by checking if the top of the Terminal app window says zsh. If this is the case, replace ~/.bash_profile with ~/.zshrc above.)
Restart the terminal and try again. Then test GHCi with a couple arithmetic commands:
$ ghci
Prelude> 2 + 2
4
Prelude> 8 ^ 10
1073741824
Usually on a terminal you stop a program by typing ctrl-c, but in GHCi ctrl-c will only stop a long-running line of code. Instead, you leave GHCi by typing ctrl-d, which means “End of Input”. You can also leave GHCi by typing :q and hitting return.
(For non-Mac users (especially Windows users) you may have to consult stack overflow and help each other for troubleshooting. None of the instructors/TAs are particularly familiar with Windows, but we can try to help the best we can!)
Git
Git (pronounced like “get”) is a version control system. Git lets you take snapshots of an entire folder and stores the snapshots as “commits”. With git you can:
- Keep a history of changes to your project.
- Work on your project on different computers.
- Work on different versions of your project.
- Share your project with collaborators.
- Quickly incorporate changes from collaborators.
To use technical terms, Git is a distributed version control system. Because of its speed and flexibility, it has become the leading tool for managing source code. For example, Github is the world’s largest storehouse of open source projects. However, Github did not make Git—that honor goes to Linus Torvalds, who you may recognize as the creator of Linux.
If you’re looking for a version control system to learn in 2021, Git is the one. You won’t be using many of its features (for example, you won’t be collaborating with each other), but you will use Git to submit code and that will give you a taste of what you can do.
You can download git here. Mac OS X computers may already have git installed.
Verify Git Installation
To check if you have git installed, run this command on the command line:
$ which gitYou should see a path, like:
/usr/local/bin/gitIf you do, you’re good to set up git.
A Bit Of Git Setup
Check your Git config and see if you have a name and email set.
$ git config --listIf you don’t have a name and email set, choose the name and email that will appear on all your commits. You do not have to use your UChicago email.
$ git config --global user.name "Name"
$ git config --global user.email "email@example.com"
Enable color to be happier:
$ git config --global color.ui autoGetting Your Repository
We created git repositories for all of you. You need to gain access to yours.
On the command line, navigate to your folder for this class. Now, clone the repository from the submission system onto your computer:
$ git clone https://mit.cs.uchicago.edu/cmsc16100-aut-21/yourcnetid.git
$ cd yourcnetid
Note: Some Mac users have reported trouble if they try to clone into an iCloud directory. Clone outside of iCloud.
Each of your labs will eventually be its own folder in this one big repository (e.g. folders named lab00, lab01, lab02, etc.). Well, it’s not a big repository yet. But it’s your one repository for this term.
There is also a web interface to your repository. Log in to https://mit.cs.uchicago.edu/ to ensure you can see your repository. After pushing changes, it’s often best to check on the web to make sure you pushed everything—because what you see on the web is what we see when we grade.
Note: This is your lab repository. You can store your homework in it if you like—it will be ignored. But complete the labs in the lab00, lab01, lab02, etc. folders that will be provided and do not change their locations within the repository.
Some Git Practice
Let’s make sure Haskell is working and practice Git’s workflow.
There should be a lab00 folder in your repository. Using your text editor (not the mit.cs.uchicago.edu web interface), make a new file in the lab00 folder called Hello.hs. Paste in this program…
data Level
    = Undergraduate
    | Masters
    | PhD
    | Other
    deriving Show


name :: String
name = "Your Name Here"

level :: Level
level = Undergraduate

major :: String
major = "Your Major or Program Here"

why :: String
why = "A sentence about what inspired you to go into CS or why you are taking this class or what you hope to gain from this course."

distance :: Int -> Int -> Int
distance rate time = rate * time
…and put in your own answers for name, level, major, and why.
Make sure to save the file as Hello.hs in the lab0 folder.
On the command line, make sure you are in the lab0 folder and then start GHCi by typing:
$ ghciYou should see Prelude>. To load the file, use :l (the letter l)
Prelude> :l HelloYou should see:
Prelude> :l Hello
[1 of 1] Compiling Main             ( Hello.hs, interpreted )
Ok, 1 module loaded.
*Main>
You can now use the items you defined.
*Main> name
"Chuck Norris"
*Main> level
Other
*Main> distance 15 20
300
There’s a still another modification we’ll make below, but it’s a good idea to submit your changes as you work.
Exit GHCi by hitting ctrl-d. Then run:
$ git statusYou should see something like:
On branch master

Starter code for lab0

Untracked files:
  (use "git add <file>..." to include in what will be committed)

	Hello.hs

nothing added to commit but untracked files present (use "git add" to track)
Git is telling you that it’s not watching the Hello.hs file. Any changes to this file will be ignored.
Tell Git to track your file with git add.
$ git add Hello.hsNow if you run git status you should see:
On branch master

Initial commit

Changes to be committed:
  (use "git rm --cached <file>..." to unstage)

	new file:   Hello.hs
We haven’t actually created a snapshot (a commit). We’re just telling Git what files we want to include in the commit. If we had more files, we could also add them to create a single big snapshot with multiple files.
Let’s just make a commit with this file.
$ git commit -m "Hello.hs with some personal info"The string after -m is your message for the commit. It’s sort of a name for the snapshot. Use it to describe what you changed since the last commit.
You can see a log of commits with git log:
$ git log
commit 30a672d7a3b3f615080a7fd79eccaa831f5285dc
Author: Brian Hempel <brianhempel@uchicago.edu>
Date:   Mon Oct 31 22:46:35 2016 -0500

    Hello.hs with some personal info
The commit is still only on your own computer. To push this change to the remote repository (the mit.cs.uchicago.edu server that’s acting as our submission system), just type:
$ git push(For your very first push, you may have to type git push -u origin master.)
You should see a message about pushing to master.
Okay, now it’s time to make a real change. Open Hello.hs and paste this code at the bottom:
main :: IO ()
main = do
    putStrLn "Hello, world!"
    putStrLn ""
    putStrLn ("My name is " ++ name ++ ".")
    putStrLn ("I am a " ++ show level ++ " student.")
    putStrLn ("I'm going into " ++ major ++ ".")
    putStrLn ("I'm in this class because " ++ why)
    putStrLn ""
    putStrLn ("If you travel for 15mph for 30 hours you will go " ++ show (distance 15 30) ++ " miles.")
Try compiling the file with:
$ ghc Hello.hsGHC should produce an executable in the same folder called Hello.
Run it:
$ ./HelloYou should see output. You’ve just compiled your first working Haskell executable!
Now, let’s commit this change.
Use git diff see any changes that we haven’t told Git we want to commit. (Note, this shows changes in tracked files only; Hello.hs is tracked because we already committed it once).
$ git diff
diff --git a/lab0/Hello.hs b/lab0/Hello.hs
index c8f78bd..79cf6e1 100644
--- a/lab0/Hello.hs
+++ b/lab0/Hello.hs
@@ -11,3 +11,13 @@ why = "Want to make computing better."

 distance :: Int -> Int -> Int
 distance rate time = rate * time
+
+
+main :: IO ()
+main = do
+    putStrLn "Hello, world!"
+    putStrLn ""
+    putStrLn ("My name is " ++ name ++ ".")
+    putStrLn ("I am a " ++ show level ++ " student.")
+    putStrLn ("I'm going into " ++ major ++ ".")
+    putStrLn ("I'm in this class because " ++ why)
+    putStrLn ""
+    putStrLn ("If you travel for 15mph for 30 hours you will go " ++ show (distance 15 30) ++ " miles.")
Or, you can see a summary with git status:
$ git status
On branch master
Changes not staged for commit:
  (use "git add <file>..." to update what will be committed)
  (use "git checkout -- <file>..." to discard changes in working directory)

	modified:   Hello.hs

Untracked files:
  (use "git add <file>..." to include in what will be committed)

	Hello
	Hello.hi
	Hello.o

no changes added to commit (use "git add" and/or "git commit -a")
The Hello executable and a few intermediate files created by Haskell are untracked. Let’s let them be and not commit them.
But we do want to commit our change to Hello.hs. Tell Git to include our change in our next commit:
$ git add Hello.hsNow, actually make the commit:
$ git commit -m "Print out my info"If you run git log, you will now see two commits:
$ git log
commit 32133475e7e83c3ba4017787f4c0d56aab35f058
Author: Brian Hempel <brianhempel@uchicago.edu>
Date:   Mon Oct 31 23:01:02 2016 -0500

    Print out my info

commit 30a672d7a3b3f615080a7fd79eccaa831f5285dc
Author: Brian Hempel <brianhempel@uchicago.edu>
Date:   Mon Oct 31 22:46:35 2016 -0500

    Hello.hs with some personal info
The “Print out my info” commit is still only on your computer.
$ git pushThere you go! If your Hello.hs file looks right on Gitlab, you’ve successfully pushed. Push early and push often.
There’s one more thing you should know. Your instructor or the graders may distribute grades by making changes to your remote repository. When there are more commits on the remote repository than on your local repository, Git will not let you push.
You have to first run:
$ git pullThis will pull any commits from the remote repository and automatically merge them with your local changes.
A vim session may open with a commit message saying “Merge … into master”. Save the message and exit vim by hitting :x (colon x).
Afterwards you can run:
$ git pushBelow is a bit more miscellanea about Git.
Graphical Tools
For the git add and git commit part of the workflow, a GUI tool may help (I, Brian, use the Mac-only GitX). A GUI helps visualize changes much better. There are equivalent tools for other operating systems. Git comes with gitk, which you might try.
Documentation
There are man pages documenting the different git commands, e.g.:
$ man git-add
$ man git-diff
$ man git-commit
$ man git-pull
...
Or:
$ git help add
$ git help diff
...
These docs describe an interactive mode for git add that you might find useful:
$ git add -i

*** Commands ***
  1: status	  2: update	  3: revert	  4: add untracked
  5: patch	  6: diff	  7: quit	  8: help
What now>
Of course, you can also search online for tutorials, for example Learn Git Branching and Try Git. (Though we don’t recommend using branches during this course—you don’t want to accidentally forget to push master and fail your lab!)
More Git
The above commands are all you should need for this class, but in the future you may want to learn more about what you can do with Git.
Git gives you complete flexibility. You can grab old versions of files. You can undo entire commits. You can work on different branches to separate different features while you are working on them. You can reorder commits. You can go back in time and change history. (However, a rule of thumb is that you should not rewrite history after pushing.)
For what it’s worth, these are the commands I (Brian) use in my programming workflow. More advanced users may find these interesting. For this course, multiple branches or rewriting history is not recommended.
git add --patch     # Okay, really through GitX; but `git add -p` is close.
git rm              # Un-stage a change so it's not committed
git commit          # Again, through GitX
git commit --amend  # Change last commit; (GitX again)
git rebase --interactive HEAD^^^^^^ # Clean up history before pushing!
git commit -a -m "wip"  # WIP commits are better than stashing. Never stash.
git reset HEAD^         # Un-commit a WIP commit (but keep changes).
git checkout file_name  # Discard changes to file
git checkout -b branch_name # New branch
git branch -d branch_name   # Delete a branch
git pull --rebase      # Pull, then re-apply local commits
git rebase branch_name # Replay commits on top of branch
git cherry-pick        # Apply a single commit from a different branch
git reflog             # Recover deleted branches or mistaken hard resets
A Final Recommendation
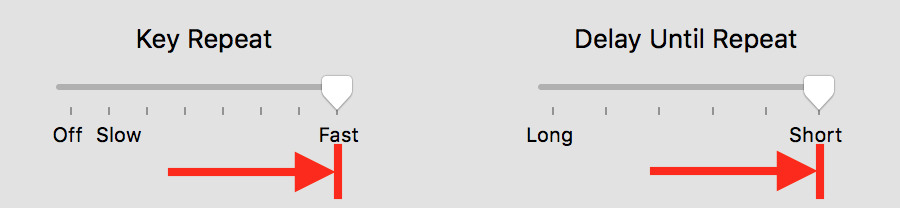
If you haven’t already maximized your key-repeat rate yet in your keyboard settings, you’ll thank yourself later for doing it now.
You’ll quickly get used to it and it will save you days worth of time.
Happy coding!